Saturday, March 31, 2012

Recipes: Indian Yogurt Chicken with Dandelion “Saag”

A house is not a home unless it contains food and fire for the mind as well as the body. – Benjamin Franklin 

Delicious Indian spices in a yogurt-based2 marinade/sauce.
Although the weather here in Nova Scotia seems to have turned back to “Farch” this chicken would be a great recipe to cook on the barbecue when the weather is nicer. Your oven broiler does a good job in the meantime.


I only did 1/2 of the chicken cited in the recipe. It was
just enough for two.
A short rant about "Farch"
“Farch,” in case you don’t know, is that long, interminably miserable two months—February and March—when we all want nothing more desperately than for Spring to arrive. I first heard the term used by Jim Meek, a contributor to our local provincial paper, several years ago. I love the word. It’s ugly, just like the last two months of winter.

Now it is officially Spring, I know. It just doesn’t feel like it here. Last night was about -6°C, and tonight we may hit -10°C. We even had some serious snow squalls yesterday. I’ve had enough. I want to be outside.

Unfortunately I didn’t have the ability to do this outside so I had to broil it, but the principle is the same. Just skewer the chicken and do it on “the barbie.”

The flavours of chicken marinated in Indian spices sometimes just hits the spot. It smells great cooking and tastes great too. The spice quantities may seem like a lot but remember it’s a marinade, so most of it gets left behind when the chicken is being cooked.


A short rant about dandelion greens
The other part of this recipe is a twist on a traditional Indian “saag” (cooked spinach). What’s more Spring-like than dandelion greens? If you’ve never had dandelion greens you should buck up and be brave. They’re actually really good.

To broil, space the chicken (and all the marinade) evenly
on a foil-lined baking sheet. Grilling would be fantastic.
For this recipe I used store-purchased greens. They’re not the same as our wild Nova Scotia dandelions. I like ours far better. 

I find the greens from the store a little bitter. Think of the bitterness of rapini as opposed to broccoli. Our local dandelions I think are “peppery” as opposed to bitter. Quite pleasant actually. 

I would suggest using local dandelion greens that you pick yourself. They’re plentiful enough since dandelions are weeds. Just make sure, as you always should, that you harvest from an unpolluted area – and wash them before use. If you have the fortune to live with pets you’ll know why…

By the way, dandelion greens are full of nutrients, so why not use something that is both tasty and free? Some  benefits are: antiviral properties; help stabilizing blood sugar; digestive aid; positive effects on cholesterol, and kidney function. So you see there's a lot of reasons to include this oft-times troublesome plant in your diet.

Last Spring we had smoked mackerel with a dandelion green salad dressed with a simple vinaigrette. That was all. It was an amazing meal.

But now back to the recipes at hand…


Remember to turn the chicken half-way through
the cooking time to brown both sides.
Indian Yogurt Chicken
Prep: 10 min  |  Marinate: 1 hour  |  Cook: 8 min  |  Serves 4
1-1/2 lb chicken breast, cubed
1/2 cup yogurt
3 green finger chillies, chopped
1 tsp ground cumin
1 tsp ground cardamom
1 tsp ground cinnamon
1 tsp ground coriander
2 tbsp chopped fresh ginger
2 garlic cloves, chopped
1/2 tsp salt
1/4 cup chopped cilantro

Mix all the ingredients together except for the chicken in a shallow dish. Cube the chicken and toss well with the marinade. Cover with plastic wrap and let marinate for 1 hour on the counter, or longer (a whole day if you wish) in the refrigerator.

Two methods to cook:
1. Arrange the chicken on foil on a baking sheet. Broil for 3-4 minutes per side, depending on your cube size, or

2. Skewer the chicken and barbecue on each side for a few minutes until browned. You could alternate the chicken pieces with tomatoes or another quick-cooking vegetable if you wished.


Dandelion greens are really good for you, and they're
free for large parts of the year. What's not to love?
Dandelion Saag
Time: 10 min
1 bunch dandelion greens
1 tbsp butter or ghee
1 onion, chopped
3 garlic cloves
1 tbsp fresh ginger, chopped
1/2 cup water
2 tsp Garam masala
1 tsp ground cumin
2 green finger chillies, chopped
salt and pepper, to taste
1/4 cup yogurt

Sauté the onions, garlic, ginger and chillies in the butter until fragrant. Add the water and dandelion greens and cover. 

Let the greens wilt for 5 minutes, then roughly purée the mixture with a stick blender in the pot. Add the Garam masala, cumin, salt, pepper and yogurt. Reheat and serve.

………………………………….

If you like this post retweet it using the link at top right, or share it using any of the links below.
Questions? Comments? Derogatory remarks?

Friday, March 30, 2012

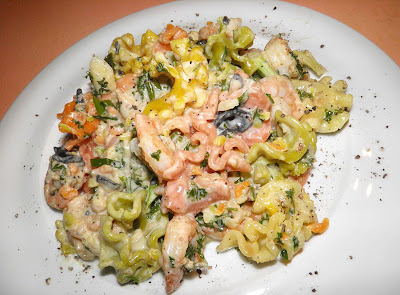
Recipe: 20 Minute Shrimp Pasta with Lemon Cream

It seems to me that trying to live without friends is like milking a bear to get cream for your coffee. It’s a whole lot of trouble, and then not worth much after you get it. – Zora Neale Hurston

Creamy, lemony, pasta-y goodness.
I picked up some interesting pasta from Winners a while back and was just waiting for some inspiration to use it. It was multi-coloured pasta in the shape of what only can be called cocks-combs.

The package called them crespelle but that’s completely wrong. Crespelle are Italian crepes. These are definitely not crepes. If anyone can identify them leave a comment. Perhaps that’s why they were at Winners (a local discount store) because the packaging was wrong? 

This is what was called crespelle on the package. If anyone
knows what they really are leave a comment.
Being in design/advertising myself I can only imagine the conversation that went on between the client and agency if that whas the case. Glad I wasn’t there.

You can use any shaped pasta with this dish, but choose one that has some surface, tooth and/or crevices. Whatever the name of the ones I purchased they were pretty groovy with lots of wavy crinkles to hold sauce. Just what the doctor ordered. And this is a sauce you definitely don’t want to go to waste.

Picture a lemony, creamy, cheesy, bright sauce tossed with pasta and just-cooked shrimp. Pair this with a salad and you have a fantastic Spring supper for four.

On the whole, people cook shrimp to death. If you ever have a dish where they're tightly curled and hard that's exactly what has happened. Shrimp only need to be cooked a few minutes.

The garlic adds depth, the cream and cheese richness, and the lemon a slight tartness that complements all three. As a matter of course shrimp are sweet so you can see how much is going on in what seems to be a very simple – and very quick – dish.

Fo goodness never over-cook your shrimp. Do you see that
some parts are still grey and uncooked? That's what you want
if you're going to simmer them for a couple minutes in a sauce.
In actual fact this is a simple dish with very few ingredients and (if you read) no herbs. It doesn’t need them. The best Italian dishes I have ever had were the most simple. 

Give this recipe a try, even if you’re not pressed for time. I’m sure it will become a favourite as fast as it is to cook!


20 Minute Shrimp Pasta with Lemon Cream
Prep: 10 min  |  Cook: 10 min  | Serves 4
2 tbsp butter
1 lb shrimp, peeled and deveined
3 garlic cloves
1 cup whipping cream
juice of 1 lemon*
1 cup shredded reggiano parmigiana
1 bunch green onions
1/2 cup parsley, chopped
salt and pepper to taste

Toss well to combine and serve. This would probably
be OK cold as well...
Melt the butter in a sauté pan or frying pan.

Add the shrimp and cook until nearly just cooked and remove to a dish. They still will be a little raw. This should take only about 2-3 minutes. The shrimp will finish cooking in the sauce.

Add the garlic to the butter in the pan. Sauté on medium until very fragrant.

Pour the whipping cream into the pan and then add the lemon juice and parmesan. Let cook until the sauce reduces somewhat and begins to thicken, abut 3-4 minutes maximum.

Add in the green onions and the shrimp into the sauce and let finish cooking through, about another two minutes. Season with salt and pepper to taste.

Add the cooked pasta and parsley to the shrimp and toss well to coat. Serve immediately.

*If you wish to boost the lemony flavour add 1 tsp of finely grated lemon rind.

………………………………….

If you like this post retweet it using the link at top right, or share it using any of the links below.
Questions? Comments? Derogatory remarks?

Thursday, March 29, 2012

Recipe: Pork & Green Chillies Enchiladas

As you see yourself, I once saw myself; as you see me now, you will be seen. – Mexican Proverb

One is actually enough, but if you're hungry have two!
Getting older sucks, but each year that goes by I feel affinity with the quote above a little more. Thank goodness that making and eating delicious enchiladas never gets old.

There’s so much variation capable in enchiladas that you will never run out of different combinations.

The filling. Flavourful with hints of lime, cumin and cilantro.
Loosely speaking, enchiladas are tortillas wrapped around a filling that can be composed of a variety of ingredients, including meat, cheese, vegetables, seafood or combinations thereof.

Although wrapped food can be dated back as far as the Maya, enchiladas as we would know them started out life in Mexico as a street food. At that time they were a corn tortilla dipped in chilli sauce and eaten without any filling at all. But now they have taken on numerous fillings and sauces.

The most usual sauce used on enchiladas is a chilli pepper-based concoction but there are myriad variations within (and without) that too.

Some commonly used sauces are mole (chocolate spiced), red enchilada sauce, green enchilada sauce, and even white sauce. In south and central Texas the favoured enchilada sauce is a sort of gravy-like brown chilli sauce. So you see, there’s a lot of choice.

My enchiladas rely on a salsa for sauce. I know it’s not enchilada sauce but seems to work every time. Combining tomatoes and corn with meat in the filling rounds out a complete meal: dairy, meat, vegetable, grain…

The trick to making good enchiladas is to ensure you have lots of flavour in the filling. That’s the reason there's 2 tsp of cumin. You’ll need good flavour to carry the day.

This recipe is my base that I use to make lots of different variations. Sometimes the corn is back beans; sometimes the tomato is pineapple. I think you can get my drift. Change an ingredient and you get a new recipe. You don’t even have to include meat if you don’t want to.

But the mainstays remain: the tortilla, the cheese and a sauce. Try your hand at rolling some tortillas, and don’t be afraid to stray from the recipe!


Just put in the oven...
Pork & Green Chillies Enchiladas
Prep: 20 min  |  Cook: 30 min  |  Serves 4-8
1 lb pork loin, in small cubes
1 medium onion, chopped
1 tbsp vegetable oil
2 tsp cumin seed
1 tsp cayenne pepper
1 tsp garlic powder
127 ml can chopped green chillies
2 plum tomatoes, chopped
341 ml (12 fl. oz) whole kernel corn
1 cup chopped coriander
650 ml salsa, medium hot
juice of 1 lime
3/4 cup grated monterey jack cheese
3/4 cup grated cheddar
8 10” tortillas
salt and cracked black pepper
cumin, sour cream and pickled hot peppers to serve

Preheat the oven to 375°F.

Heat the oil in a sauté or frying pan with deep sides.

Hot out of the oven.
Add the chopped onion and sauté until just beginning to soften, about 4 minutes. Add the pork and continue to cook until the meat is no longer pink. Add the cumin, cayenne, garlic, chopped green chillies, tomatoes and corn. Cook until warmed through and then remove from the heat.

Pour about 1/3 of the salsa into the filling and mix well. Add about 1 tsp each of salt and pepper, or to taste. Stir in the chopped cilantro and lime juice.

Place about 1/2 cup of the salsa in an oven proof pan capable of holding 8 rolled tortillas. Smear the sauce over the bottom to cover.

Divide the filling into 8 equal portions and fill each tortilla, rolling closed and ending with the seam side down in the pan. Repeat until all the filling and remaining tortillas are used.

Mix about 3/4 cup of water (or cream which is even better) with the remaining salsa and pour over the top of the rolled enchiladas.

Sprinkle the cheese evenly over the top. Bake for 30 minutes or until bubbly and golden.

Serve with sour cream, pickled peppers and cumin at the table.

………………………………….

If you like this post retweet it using the link at top right, or share it using any of the links below.
Questions? Comments? Derogatory remarks?

Wednesday, March 28, 2012

Recipe: Homemade Extract of Clove

Nothing is pleasant that is not spiced with variety. – Francis Bacon

Today's victims.
This is number 3 in my quest for extracts to make inexpensively at home. It's always good to know how to make things yourself that cost a lot of money to buy, if you can even find them...

Photo: Wiki CC
I have seen extract of clove for sale at bakery shops, health food stores and the local bulk food store. It’s usually sold in tiny little bottles for several dollars. Clove oil, a stronger extract, can be purchased over-the-counter at pharmacies.

Making extract of clove is as easy as making homemade vanilla or cardamom extract, both of which I posted previously. Use that search button at the right. I’m sure it gets lonely…

If what I see with my own eyes is correct, extract of clove may be one of the fastest extracts you can make. Within 24 hours the colour was darker than my month-old vanilla. That bodes well.


A brief history of cloves
During China’s Han dynasty, supplicants addressing the emperor we required to have cloves in their mouths to mask their bad breath. That reminds me of a joke by George Carlin: “If you run out of deodorant, put a bay leaf under each arm. It won’t stop you from perspiring, but you’ll smell like soup!”

A 14th Century French apothicaire. Photo: Wiki CC
Cloves made their appearance in Europe in the 4th Century as a luxury spice. Because of its ancient use in medical preparations (other than masking bad breath) it wasn’t long before Europeans were exposed to home-cooked medicines of various “effectiveness” using clove oil (the distilled, stronger extract).

From healingnaturallybybee.com:
The medieval German herbalists used cloves as part of anti-gout mixture. Once clove became easily available in Europe, it was prized as a treatment for indigestion, flatulence, nausea, vomiting, and diarrhea. It was also used to treat cough, infertility, warts, worms, wounds, and toothache. European hospitals use clove to treat viral hepatitis, bacterial colitis, hypertension, thyroid dysfunction, and fatigue.

Early American Eclectic (huh?) physicians used clove to treat digestive complaints and added it to bitter herb-medicine preparations to make them more palatable. They were also the first to extract clove oil from the herbal buds. They used it on the gums to relieve toothache.

Traditional uses in America include treating worms, viruses, candida, and various bacterial and protozoan infections. Clove is also used for toothaches, bad breath, dizziness, cough, earache, colitis, epilepsy, palsy, and digestive upsets, as a sleep-inducer, anti-inflammatory, blood-thinner, mental stimulant, etc.


Proven health value of cloves
From whfoods.com
Clove contains significant amounts of an active component called eugenol, which has made it the subject of numerous health studies, including studies on the prevention of toxicity from environmental pollutants like carbon tetrachloride, digestive tract cancers, and joint inflammation. In the United States, eugenol extracts from clove have often been used in dentistry in conjunction with root canal therapy, temporary fillings, and general gum pain, since eugenol and other components of clove (including beta-caryophyllene) combine to make clove a mild anaesthetic as well as an anti-bacterial agent. For these beneficial effects, you'll also find clove oil in some over-the-counter sore throat sprays and mouth washes.

Anti-Inflammatory Activity
Eugenol, the primary component of clove's volatile oils, functions as an anti-inflammatory substance. In animal studies, the addition of clove extract to diets already high in anti-inflammatory components (like cod liver oil, with its high omega-3 fatty acid content) brings significant added benefits, and in some studies, further reduces inflammatory symptoms by another 15-30%. Clove also contains a variety of flavonoids, including kaempferol and rhamnetin, which also contribute to clove's anti-inflammatory (and antioxidant) properties.

A Nutrient-Dense Spice
Like its fellow spices, clove's unique phytonutrient components are accompanied by an incredible variety of traditionally-recognized nutrients. Using our nutrient ranking system, we determined cloves to be an excellent source of manganese, a very good source of omega-3 fatty acids, vitamin K, dietary fiber, and vitamin C and a good source of calcium and magnesium.


Extract of clove at right. This is after only 24 hours.
My culinary uses
I’m going to use my essence of clove in baked goods. It should add a nice zing to gingerbread, chocolate cake, spice cookies or any other food that uses whole or ground cloves.

It could also be tossed with apples before baking a pie, or many other fruits in compotes or tarts.

Use your imagination! Watch for more extracts in the future...


How to make Extract of Clove
1 bottle with well fitting top (either cork or screw)
vodka
clove buds

Fill your chosen container 1/3 full with clove buds. Pour the vodka over the top and let it age for 3-4 weeks before use. 

There is no need to strain the infusion but it may make it easier to pour...To use it taste how strong your infusion is and judge from there.

………………………………….

If you like this post retweet it using the link at top right, or share it using any of the links below.
Questions? Comments? Derogatory remarks?

Tuesday, March 27, 2012

Recipe: Cilantro Walnut Pesto Chicken

Some writers say the leaves are used for seasoning, but this statement seems odd, as all the green parts of the plant exhale a very strong odour of the wood-bug. – Vilmorin-Andrieux, The Vegetable Garden (1885)

A great way to use too much cilantro.
That’s an odd quote, especially since it's from an 1885 gardening book. I actually quite like fresh cilantro. What I don’t like is being “forced” at the grocery store to purchase too much.

Most recipes that use cilantro call for 1/4 cup, 1/2 cup or even 1 cup at the absolute most. Why on earth do the sell it by the bushel at the grocery stores? Huge bunches. In case you don’t know what a bushel is, it’s the equivalent of 4 pecks.*

Deliciously different pesto.
So what can you do with your leftover cilantro? I usually think of making Thai food, or in this case, pesto. Cilantro is quite common as an ingredient for pesto, usually paired with walnuts. 

It’s essentially just a substitution of two ingredients in regular basil pesto. If you have a favourite recipe just substitute the cilantro for the basil, and walnuts for the pine nuts.

So now I have to deal with the pesto. Alas, my life is full of travails.

I found a reference online about stuffing chicken breasts with pesto so I thought the same could be done with thighs. Why not? The recipe was simplicity itself, just the chicken, pesto and some salt and pepper. I’ll outline my method below.

I believe this would be stunning rubbed between the skin and meat of a turkey if anyone is thinking of roasting one for Easter.

I served this dish with a variation on one of my all-time favourite Italian recipes: pasta with pesto, green beans and potatoes. If you’ve never tried it you have no idea what you’re missing. You can find directions HERE.

My variation was Romano beans and potatoes tossed in cilantro with some cream. You have to only cook the potatoes until “al dente.” Still a little crisp. Heat the beans in the same water with the potatoes for the last 3-4 minutes of cooking time. It's always good to not dirty a pot.

I think I cooked my potatoes for a couple minutes too long, but it was still great.

Try this meal. The pesto potatoes and beans are very filling, a little different and delicious.


I made enough for two people. The recipe feeds four.
Cilantro Walnut Pesto
Time: 10 min  | Yield: about 1-1/2 cups
1/2 cup walnuts, toasted if you wish
3 cups chopped cilantro
6 garlic cloves
1/2 cup parmesan
1/2 tsp salt
about 1/2 cups olive oil

Combine all the ingredients except for the olive oil in a food processor and purée. With the motor running pour in enough olive oil to make a loose mass. By that I mean it moves fairly easily around the bowl.

Remove to a covered dish and refrigerate until ready to use.


Cilantro Walnut Pesto Chicken
Prep: 5 min  |  Cook: 40 min  |  Serves 4
8 chicken thighs, skin on and bone in
8 heaping tsps pesto
salt and pepper

Ready for the oven.
Preheat the oven to 400°F.

Loosen the skin on each chicken thigh. Place 1 tsp of pesto between the skin and meat and smooth it around so it covers the inner surface. Season each thigh with salt and pepper.

Place the thighs bone-side down in a hot dry sauté pan and let brown until the release easily. Chicken fat will render out while it fries. There is no need to add oil.

Turn and repeat on the pesto side, taking care not to break the skin free of the thigh. The chicken will release when it’s ready.

Place the thighs in an oven-proof baking dish and bake in the oven for 25-30 minutes.

Serve with the potato bean side dish described above.

*OK, I was just having fun. A bushel is an old harvesting measurement, as is a peck. Do you remember “Peter Piper picked a peck of pickled peppers…? Loosely, 1 bushel is equal to 150 cups. That’s a lot.

………………………………….

If you like this post retweet it using the link at top right, or share it using any of the links below.
Questions? Comments? Derogatory remarks?

Monday, March 26, 2012

Booze of the Week: Desert Rose Tequila

One tequila, two tequila, three tequila, floor. – George Carlin

How often have you heard someone say they don’t like tequila? Probably almost as often as you’ve asked someone if they would like any, right?

I admit, tequila is an acquired taste. I didn’t like it either. But a recipe for a mixed drink I posted for my lavender liqueur (HERE) changed my mind. It was for a drink that used lavender liqueur, lime and tequila.

That recipe was called a Desert Flower. Boy was it good. Dangerous, but good.

So I began to think. If people don’t like the taste of tequila why not change it. That always seems to be the problem. Now I’m no distiller so I can’t alter it in the distillation but I certainly can add to it it after the fact.

So that is what I did. I have successfully infused regular tequila (not even the expensive stuff) with lots of floral and citrus notes to make something new. I call it Desert Rose.

This takes 3 weeks to infuse, but that’s not too long. Many infusions take longer. To counter some of the pucker-power of the tequila I also added some sugar and water. This wasn’t the same amount as regular liqueurs that I post, so this still has a lot of alcohol content. I’m not sure how much but I imagine somewhere around 30%.

I also “fortified” it with a small bottle of dark rum. The caramel flavours also help to mellow the “piney” taste of the tequila.

So treat this with respect.

Spring is here and the warmer weather won’t be too far behind so what better time than to go out and buy some tequila to turn into the star of your backyard gatherings? Remember you’re 3 week away from being able to serve it, although sitting a bit longer is recommended.

I started with 375 ml of tequila. That was a mistake. I would suggest that you double the recipe and use 750 ml of tequila. That way you’ll have 1.5 L  on hand to share when guests rave about your concoction!

I suggest serving it with soda and a limoncello or a similar citrus-based liqueur. Recipe for that is at the bottom. I made a quickie Límon liqueur that I posted previously. That link is HERE.

This isn’t my last foray into the flavouring of liquor other than vodka. Right now I’m infusing berries in gin. It will be posted in about 1 week. To find out about that one you'll have to come back.


Desert Rose Tequila Liquor
Time: 3 weeks  |  Makes about 750 ml
500 ml tequila
1/3 cup lavender blossoms, dried
1 tbsp calendula petals, dried
rind of 1 lime
50 ml dark rum
1/4 cup sugar
3/4 cup water

Place the tequila in a Mason jar. Add lavender blossoms, calendula and lime rind.

Let steep for 3 weeks. Strain through a moistened coffee filter in a sieve, reserving the botanicals.

Make a syrup from the sugar, water and reserved botanicals. Bring to a boil and let simmer for 3 minutes. Strain the syrup through a coffee filter.

Combine the syrup, infused tequila and rum and bottle. This will be better if allowed to age a further month.

Serving idea:
Fill an Old-Fashioned glass (one of the short ones...) with ice. 

Add:
1 oz Desert Rose 
1 oz Límon liqueur 

and top with soda water.
Voila!

………………………………….

If you like this post retweet it using the link at top right, or share it using any of the links below.
Questions? Comments? Derogatory remarks?

Sunday, March 25, 2012

Recipe: Lacto-fermented Roasted Peppers

If the preservation of the home means the enslavement of women, economically or morally, then we had better break it. – Agnes Macphail (1st woman elected to the Canadian Parliament, 1921)

Lacto-fermented roasted red pepper. Lacto sauerkraut (one day old) behind.
Let’s talk about preservation. We’ve all heard of pickled peppers before, but what about lacto-fermented? Pickling is a common method of preservation that uses salt, vinegar and spices to preserve vegetables, meats, etc. “Lacto” is a bit different.


What is lacto-fermentation?
1. Place cleaned peppers on a foil-lined
pan. Rub with vegetable oil.
Lacto-fermentation is a very ancient preservation technique. It uses beneficial bacteria already present on food including lactobacillus and bifidobacterium (and other present lactic acid probiotics) that will thrive in an air-free fermenting environment. If the names sound familiar it’s because they are present in, and a major selling feature of, yogurt.

A wide variety of beneficial lactic-acid bacteria and yeasts work together in the process of lacto-fermentation. They convert raw food into a more easily-digestible product . In the process other difficult to access nutrients in the food are released that often "pass through." 

2. Roast until the peppers begin to blister. Remove skin.
In a nut shell, lacto- fermentation employs salt to draw liquid from the item being fermented to form a brine. The resulting brine then keeps bad (rotting) bacteria at bay until the lactobacillus and friends kick in. The good bacteria then overpower the other bacteria and do not allow them to grow.

I have made cabbage a couple times. It is very close to the store-purchased sauerkraut but somehow far tastier. The cabbage is transformed. The recipe can be found here.

The lacto-fermentation method can be used with many different vegetables, including all peppers. I happened to use red bell peppers for this recipe because I found some at half price. You know me – I can’t pass up a deal…

I have made jalapenos before but heed some friendly advice. If using hot peppers wear gloves. I really mean it. The whole night after making them my hands burned between my fingers even after washing about six times! Unpleasant to say the least.

You all should try this at least once. You’ll be surprised at the results. If for some reason it doesn’t work, you’ll be able to tell by the look and smell, so it’s quite a safe process.


3. Slice into strips and sprinkle with salt. Knead gently.
Lacto-fermented Roasted Peppers
Yield: 1 pint (500 ml)
4 red bell peppers, washed
1 tbsp vegetable oil
1 tbsp salt
plus 1 tbsp salt in1 cup hot water

Cut the stems out of the peppers and remove the seeds. Cut each pepper in half and flatten.

Arrange on a foil-lined cookie sheet. Rub the surface of each pepper with oil. Don’t use olive oil because it has a lower smoking point than vegetable oil.

Roast the red peppers under a broiler at a distance of about 8 inches for approximately 7 minutes, or until they begin to blacken. Remove from the oven and cover with more foil to sweat as they cool.

4. After kneading. Notice the collected juices.
Once cool, remove the burnt skin and slice into strips. Place the strips in a bowl.

Sprinkle the strips with 1 tbsp salt and knead gently for about 10 minutes taking care not to break up the slices. You will notice liquid will be drawn out of the peppers.

After the 10 minutes, place the slices in a sterilized 500 ml (1 pint) Mason jar. Pour the collected liquid over the top.

The liquid has to come up to the top of the peppers. If it doesn't, mix another tbsp of salt with very hot water and pour over the top. Use only enough brine to cover.

Seal tightly and wait at least 1 month before using. Once opened, refrigerate.

………………………………….

If you like this post retweet it using the link at top right, or share it using any of the links below.
Questions? Comments? Derogatory remarks?

Strange Gardening: Monkey’s Hand Tree

All things must change to something new, to something strange. – Henry Wadsworth Longfellow

Blossoms of Monkey's Hand Tree. Photo: J.G. in S.F., Flickr ccl
Here is something very strange, and new, to me at least. The scientific name is Chiranthodendron pentadactylon, otherwise known as the Monkey's Hand Tree – for obvious reasons.

Photo: Tatters:), Flickr ccl
I was looking at Chiltern’s Seed Catalogue (from the UK and fantastic) when I spotted an entry for this oddity. A more strange, beautiful, creepy (you name it) flowering tree I don’t think I have seen. It must be absolutely stunning in full height and bloom.

So I just had to share it. I think others describe it far better than I ever could so here we go.


From Chiltern’s catalogue:
If ever a plant justified its common name, this is it! The Mexican Indians once regarded this strange tree with superstitious awe and it was the focus of a religious cult. Once you see the extraordinary flower it produces, you can't really blame them. There are no petals but the five leathery sepals form themselves into a maroon cup containing an abundance of honey. And now comes, as it strikes the writer, the creepy bit: from this emerge five, three-inch, red stamen columns arranged just like a thin-fingered human hand, each finger ending in a lethal looking claw. 


Photo: Tatters:), Flickr ccl
The picture is completed by the matching red style at their base just like a thumb - give the whole thing a felt nib and it could well start writing you messages on the wall! This is a very rare, fast growing tree from Central America ideally suited for cool conservatories, although our supplier suggests trying outdoors in the very mildest parts of the country. (Note - that's the UK)

Although you will have to wait for five years or so for your first flowers, from then on it will bloom continuously from April to October. In the meantime, you will have an attractive and unusual foliage plant with its leaves green on top and covered with brown, fuzzy, wool-like hairs below.


From Wikipedia:
This species is native to Guatemala and southern Mexico. The unusual appearance of the 'hands' has stimulated cultivation in gardens around the world, primarily in North America where it grows well near its native range. The leaves are large and shallowly lobed, with a brown indumentum on the underside. The distinctive flowers appear in late spring and early summer; the five stamens are long, curved upward, and bright red, giving the distinct impression of a clawed hand.

It was originally described from a single cultivated specimen grown in Toluca in the Toluca Valley, well outside the native range. The Aztecs revered the tree, and picked every bloom annually to prevent it from reproducing.

Intergeneric hybrid
It is closely related to Fremontodendron, sufficiently to produce an intergeneric hybrid x Chiranthofremontia lenzii Henrickson, which has yellow flowers and a reduced form of the claw.


Photo: J.G. in S.F., Flickr ccl
Monkey’s Hand tree flowers from April through September in its native habitat. At maturity its height can reach 20-40 feet (7-14 metres).

Now for the sad part for me. Monkey’s Hand tree is only hardy in USDA Zones 9-11. Pockets of Nova Scotia are Zone 6 at best. So if you’re not in the proper zone it is only able to be grown as a conservatory tree, or put out in a pot in the summer and brought inside for winter.

That’s not as difficult as you may think if you have the room. It won’t reach full height of course, but you’ll probably get a lovely short tree that blooms. I have successfully kept a bay laurel tree (for culinary use) inside before for many years and it’s Zones 8-10.

There’s also a garden centre in Brooklyn, Nova Scotia that sells fig trees. They’re Zones 7b-11 so would have to be brought inside. I’ve also heard of success outdoors by “tipping” (burying in the ground) to overwinter with so-so success. But I wouldn’t try that with anything Zones 9-11.

So if I ever live anywhere with large, bright windows I may just try this. It’s certainly worth a shot!


Where to purchase?
$6.76 for a packet of 5 seeds (seed is scarce)

Their catalogue is absolutely amazing and a necessity for any serious gardener. 

Go buy one from their website – seriously. I don't know what I  would do without it. Where else can you get this extensive a collection of exotic and unusual seeds for your gardens? There’s no pictures, just pages and pages and pages of well described, amazing flowers, herbs, trees, shrubs, vegetables, etc., from all over the world!

Photo: Wiki CC
………………………………….

If you like this post retweet it using the link at top right, or share it using any of the links below.
Questions? Comments? Derogatory remarks?

Saturday, March 24, 2012

Easy Recipe: English Sausage Rolls

Part of the secret of a success in life is to eat what you like and let the food fight it out inside. – Mark Twain 

Not for dinner every night, but for some nights, absolutely. (Kid-friendly, too!)
There’s lots of “junky” food, isn’t there? You know what I mean…the fast stuff that is either purchased pre-made or you assemble from "fast" pre-made ingredients. 

One such food that has been so bastardized is the lowly sausage roll. The “junky” equivalent is hotdogs in pre-made crescent roll dough with process cheese food. It actually says that on the package – "cheese food." You know to what I refer…

Yes, they’re quick, but did you know you can assemble “the real thing” in essentially the same amount of time, and they taste so much better?

Sausage rolls actually have a bit of a history and are not – as one might assume – a recent invention by marketers to use their pre-made products.

From what I have read, mass consumption of the sausage roll can be traced back to London’s Crystal Palace Exhibition in 1851. Over 28,000 were sold to visitors over the time the exhibition was running. A recipe for sausage rolls also appears in a British cookbook from the 1870s – Cassell’s Dictionary of Cookery. It appears they made an impression.

Sausage rolls are easy – really easy if you buy pre-rolled puff pastry and sausage links. You don’t have to use loose English” banger sausage. I just happened to have some in my refrigerator.

Any fresh sausage will do – hot Italian, apple sage, chorizo, etc. Try your hand at making your own, which is what I did (recipes here). I have several sausage recipes on this blog.

I found some “not-too-bad-at-all-for-store-bought” butter puff pastry at a local grocery that came pre-rolled into two sheets. That small fact is a godsend. If you want to make your own puff pastry go right ahead, or as we say in Nova Scotia "fill your boots." Colourful, aren't we?

These were pretty tasty, although watch out. They’re very hot when first from the oven. I gave the roof of my mouth a really good burn. Live and learn I guess.

I served these with a very simple salad of sliced cucumber and tomatoes with a basil cream dressing. It was a really delicious counter to the rolls and cheese.

I know, I know, it may not be the most healthy main course, but as it’s been said: “All things in moderation, including moderation.”

Enjoy!


English Sausage Rolls
Prep: 15 min  |  Cook: 25-30 min  |  Yield: 8 rolls
1 lb pork sausage meat, or 8 individual  links
450g package puff pastry
8 pieces cheddar cheese
1/4 cup Dijon (or grainy) mustard
1 egg, beaten

Preheat the oven to 400°F.

If purchasing unrolled blocks of puff pastry (they come in two’s), roll each out to a square about 12” x 12”. As I said, mine were pre-rolled. Cut each sheet into 4 equal pieces for a total of 8 squares. 

Brush half of each square with mustard. Be a little generous with it. Place two pieces of cheddar on each roll. Divide lose sausage into 8 pieces, and roll into small logs and place between the cheese. If using links just place between the cheddar pieces. 

Roll the pastry up over the sausage and place on a baking sheet, seam side down. Beat the egg slightly and brush each roll with the egg wash.

Bake for 25-30 minutes or until the rolls are puffy and golden.

Way better than hotdogs in crescent roll dough!

………………………………….

If you like this post retweet it using the link at top right, or share it using any of the links below.
Questions? Comments? Derogatory remarks?