Sunday, December 19, 2021

Foraging for winter chanterelles

Nature alone is antique, and the oldest art a mushroom. – Thomas Carlyle


NOTE: Never eat anything you forage unless you are 100% sure that it is not poisonous, and is not growing in a polluted spot. I am in no way professing myself to be a mushroom expert. So always consult an authoritative source. Joining a local mycology Facebook group would be useful as well. 


It’s a little late to forage this mushroom now. We’re in the middle of a good old-fashioned Nova Scotia snow storm today. But up until just a few days ago, if you found yourself in the woods with the right conditions, you could probably find winter chanterelles fairly easily.


I’m new at mushroom identification, but winter chanterelles are what’s referred to as a “beginner mushroom”. There’s really nothing poisonous that looks like them if you know the identifying features. Those features allow you to harvest with relative confidence.


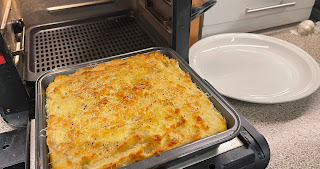
Winter chanterelles (Craterellus tubaeformis) are an edible mushroom that are quite common in the woods of Nova Scotia. In fact, they have a very wide distribution including all of the temperate/cold regions North America and Europe plus a few other areas around the globe.


Locally, their preferred habitat is moist moss underneath spruce, pine or hemlock trees. From the top they have sort of a “fall deal leaf yellow/brown” colour, which makes spotting them tricky until you zero in on your first one. Then – like magic – you seem to see them everywhere. Once your eyes zero in on them they’re actually difficult not to see.


They have four significant identifying features:

1. a yellow stalk (another name for them is yellowfoot chanterelle)

2. branching ridges/veins under the cap as opposed to sharp gills

3. a hollow stem

4. a slightly frilled funnel shape (depending on the age of the mushroom)


Even though in the same family of their more desired cousin the golden chanterelle (Cantharellus cibarius) to my taste I prefer these. We first stumbled across these in October, a while after their season (fall through winter) had begun. Since then we’ve dropped them in a few dishes with wonderful results. 


Winter Chanterelles have a sort of peppery, mild taste – fortunate since they’re so common. They’re so common it’s hard not to want to dry some, and once dry the smell can only be described as very “mushroomy”, like the classic mushroom smell of cream of mushroom soup. We air dried several pounds, the result being only a few hundred grams. They dry very well due in part to their hollow stem. Unfortunately this hollow stem also allows for hemlock needles to fall down the funnel shaped top. So careful cleaning is called for before using fresh or drying.


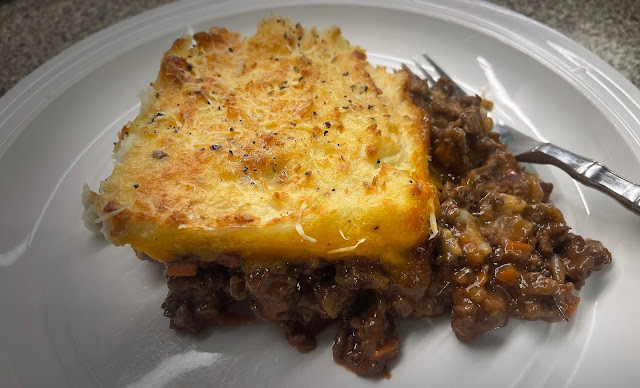
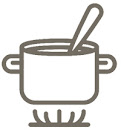
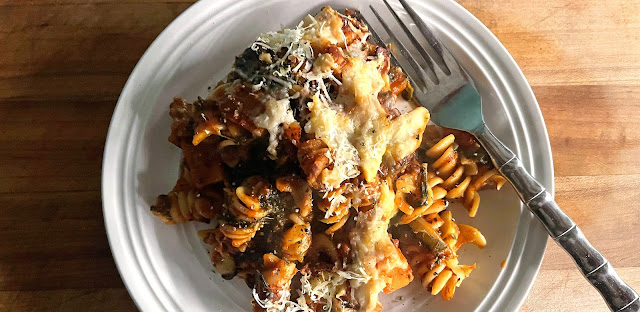
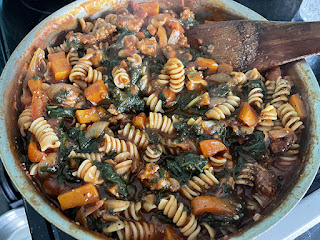
Mushrooms are invariably better and cost more when fresh, but even dried they are a valuable resource - both in the culinary and monetary senses. We had a bit of a drying factory going in our sunporch with these. We dried an amount in value (if purchased dried) of close to Canadian $200. So a good thing to have in your pantry for free. Rehydrate those suckers and you’re off to the races. They are great with meats, in soups or with pasta dishes.


Here’s a tip about using fresh wild mushrooms in general, once you have identified their edibility 100%. Wild mushrooms are full of water, unlike most mushrooms you purchase in a store. So you have to do what is called “dry sautéing” before use. Essentially you put them in a dry pan and sauté until the liquid in them comes out and evaporates. Only then should you add any fat and brown them. The taste improves greatly (for fresh) if treated this way.


It’s nice to be sitting at my kitchen table watching the snow come down and knowing that in the pantry is a wonderful addition to meals that will last me through winter and quite probably spring and part of summer. I may even venture selling some fresh or dried next season. I’m certain I’ll have some takers.


#foraging #wildmushrooms #chanterelles # freefood


.......................................

©2021 Docaitta Lifestyle. Feel free to disseminate on any and all of your social media orifices. The more the merrier. :-)

Sunday, December 5, 2021

Lemon Glazed Cranberry Walnut Loaf

"Winter is the time for comfort, for good food and warmth, for the touch of a friendly hand and for a talk beside the fire: it is time for home."

- Edith Sitwell


It’s December 5th and Christmas in only 20 days away. Where has this year gone? The humid days of summer slipped into a warm autumn and then in the blink of an eye they, too, were gone.


We had our first real snowfall last night. It was only about an inch or less, but on the dog walk this morning everything was covered in a quiet white blanket. It’s funny how even a little snow seems to mute the noise of daily life. It’s like the world has paused and taken a breath.


With the snow comes temperatures below 0°C. And when you’re not used to it, it can take you aback. A’back all the way to bed under a woollen blanket. But no such luck for me. If I sleep during the day I do not at night. I seem to have enough trouble with that these days without the extra help of a nap.


So what does one do to get that feeling of warmth without a trip to bed? I find baking does the trick. The feeling you get from a warm blanket is the feeling of home, of love, of comfort. The same holds true for a tried and tested old time recipe. My copy of this recipe is stained from use and scribbled on as I modified quantities and ingredients to get it to where it is today.


Living in the country has many benefits (as well as drawbacks). But one of the greatest benefits is the wild food you can find, if you’re willing to look. The foraged part of this recipe is the cranberries. Living close to a lake with many pockets of bog you’re bound to find cranberries. They're best after a frost or two has hit them. A few weeks ago I picked about 4-5 cups on a dog walk with my boy. He had the benefit of running around off-lead exploring to his heart’s content, and I had the benefit of harvesting some free fruit.


Nothing tastes as good as food you have harvested yourself, or something fresh from the oven made with your own hands. Couple that with a very easy recipe (yes, cake can be easy), and you have something to warm your heart as you warm yourself by the fire.


R E C I P E

Lemon Glazed Cranberry Walnut Loaf


1 cup fresh cranberries
1/3 cup small walnut pieces
1 tbs flour


Loaf batter:

1-2/3 cup flour

1/2 cup softened butter

1 cup sugar

2 large eggs

2 tsp baking powder

1/4 tp salt

1/2 cup whole milk

grated zest of 1 lemon


Glaze:

 juice from 1 lemon

enough icing sugar to make a thin glaze that runs


Preheat the oven to 350°F. Butter a 9” x 5” loaf pan.


Wash the cranberries and gently shake to get rid of most of the water. Place them with the walnut pieces in a small bowl. Toss with the tablespoon of flour to coat. This step helps the nuts and berries stay suspended in the batter when baking and not all sink to the bottom.


Mix together the flour, salt and baking powder and set aside.


In a mixing bowl, cream together the eggs and sugar on high speed until light and fluffy. This may take up to 5 minutes. Add the eggs, one at a time, and beat to incorporate after each addition.


Then add 1/3 of the flour mixture and mix just until it is incorporated. Then add 1/2 the milk, then repeat with remaining, 1/3 flour, 1/2 milk and 1/3 flour. Do not over-beat. Mix at each stage until the ingredient is just combined. Then fold in the nuts/cranberries mixture and lemon zest.


Scoop the batter into the prepared loaf pan and smooth the top, taking care to make sure the batter fills the corners of the pan. Bake for 45-55 minutes, or until a toothpick inserted into the centre comes out clean.


Without removing the cake from the tin, poke holes over the to with the toothpick. Mix together the lemon juice and icing sugar. Brush the glaze over the top of the loaf. Let cool and remove from the pan. If you can’t get the loaf out that’s perfectly fine. Individual slices come out easily. 


If you do want to present the loaf at the table uncut, remove it from the pan onto a serving dish before glazing. But if you do, some of the glaze will just drip off the loaf. 


#comfortfood #cakerecipe #cranberry #cranberryloaf


.......................................

©2021 Docaitta Lifestyle. Feel free to disseminate on any and all of your social media orifices. The more the merrier. :-)

Sunday, November 28, 2021

Cottage Pie with Wild Mushrooms

Cooking is like love. It should be entered into with abandon or not at all. - Harriet Van Horne


As the mercury in the thermometer heads south (but I cannot) my thoughts always turn to comfort food. You know what I mean - the kind of food that conjures up a wood fire in the kitchen, a warm quilt around your shoulders, laughing loved ones busying with meal preparations, and a feeling in the air that is almost like an actual embrace.


Merriam-Webster defines comfort food as “food prepared in a traditional style having a usually nostalgic or sentimental appeal.” If that’s our definition then this one hits a home run. It’s Cottage Pie. 


Cottage Pie is one of those dishes mom and dad used to make when we were young. It takes ingredients that were readily on hand and cheap. Its the kind of healthful dish parents used to feed themselves and a couple children, or scaled up to more generous table sittings if relatives were coming.


This hits so many nostalgic notes with me. Separately the main ingredients are the stuff of childhood supper nightmares. Potatoes, carrots and beef. But put them together and something magical happens. Perhaps its the secret ingredient that my intro quote mentions. Perhaps now with both our parents gone I finally appreciate how much love was part of my daily life. Perhaps it is every child’s fate to never see what is right in front of them until it’s gone.


Cottage versus Shepherd's

There is a subtle difference between traditional cottage pie and shepherd's pie, even though the names are used interchangeably. Cottage pie uses ground beef while shepherd's uses lamb (shepherds tend sheep). Obvious, eh?


Of course I couldn't leave well enough alone...

One extra ingredient I added that you won’t find in most recipes is wild mushrooms. I’ve been foraging a fair bit of late and have become hooked on identifying and using the edible mushrooms that grow here in Nova Scotia. Before I made this I took the dog for a walk and came back with several choice hedgehog mushrooms (Hydnum repandum). They’re wonderfully flavourful, if a little weird looking. They have neither gills or pores, but small “spines” on their underside.


Hydnum are what is called a beginners mushroom because they are so easy to identify and have no poisonous lookalikes. They added a robust, earthy flavour that was absolutely wonderful and they don’t seem to be put off by the cold weather we’ve been having lately. At least not yet...


So if you’re looking for a dinner recipe that is warm and comforting, easy to prepare and wont break your wallet read on.


Recipe

Cottage Pie with Wild Mushrooms

Prep: 45 minutes  |  Bake 25-30 minutes  |  4 servings


300g fresh wild mushrooms (or Cremini from the store), chopped or torn

1 tbsp olive oil

3 garlic cloves, minced

1/2 onion , diced

1 medium carrot, diced

1 celery rib, diced

500g ground beef

1/4 cup all purpose flour

1 tbsp tomato paste

2 cups beef broth/stock

1/2 cup red wine

1 tbsp Worcestershire sauce

1 tsp dried thyme

1 tsp dried rosemary

1 dried bay leaf

1/2 tsp salt, or to taste

1 tsp black pepper

1 kg potatoes (a little more than 2 lbs)

1/2 cup milk

2 tbsp butter

1/4 cup gruyere (or parmesan) cheese, grated


Heat a large skillet on high and add the mushrooms to the DRY pan. Allow them to cook until the liquid in them expresses and then evaporates. Remove to a bowl. Note, this is a step you really should do if you're using foraged mushrooms. Really fresh wild mushrooms have a very high water content. Doing this dry fry concentrates their flavour.


Heat oil in the same skillet over medium heat. Add onion, carrots and celery (the three are called a mirepoix or soffritto, a backbone of French and Italian cooking) and cook for about 3-4 minutes or until softened. Then add the garlic and cook for another minute. 


Then turn the heat to high and add the beef. Cook, stirring and breaking up the beef until it is no longer pink. Then add the mushrooms back into the pan. Sprinkle the flour over the top and mix well. Then add the tomato paste, stock, wine, Worcestershire sauce, thyme, rosemary, bay leaf, salt, and pepper. Bring to a simmer while stirring and let cook until the sauce is reduced and thickened.


Once the sauce is reduced to your liking, turn off the heat and let cool while you cook the potatoes. The sauce that you leave at this point is the amount you will have in the end result, so don't dry it out too much. You want "gravy". Cooling the meat filling while you make the potatoes ensures your cottage pie will have separate layers when baked.


Peel the potatoes, chop into evenly sized pieces, place in a pot with enough water to cover, add some salt, and let cook for 15 minutes or until soft. Drain, mash and add in the cream and butter. Set aside.


Preheat the oven to 350°F. To assemble, place all the meat filling in the bottom of an 8x8 oven-proof pan. Then add all of the mashed potato and smooth over the top, ensuring to cover to the edges. The sprinkle on the gruyere and a little pepper if you wish.


Bake, uncovered, for 25-30 minutes until the dish is well heated through and the top has become golden brown. Serve with crusty warm bread. 


#comfortfood #tradition #oldrecipe #beefrecipe #cheaprecipe #quickrecipes


.......................................

©2021 Docaitta Lifestyle. Feel free to disseminate on any and all of your social media orifices. The more the merrier. :-)

Wednesday, November 24, 2021

Holiday tradition (in pie form)

Tradition is not the worship of ashes, but the preservation of fire. Gustav Mahler


This recipe is an idea for our friends in the USA who will be celebrating their Thanksgiving tomorrow. I would imagine that many of you will be finding yourselves in the kitchen, frantically preparing for the festivities.

Almost certainly part of that celebration will be in pie form. And most probably pumpkin.

But what about those who don't really care for pumpkin pie? There really should be a delicious option for them. I'm OK with pumpkin pie but if there's another option I would probably gravitate toward it, or even have a slice of both!

The forgotten classic

Have you ever thought about a traditional old-fashioned custard pie for your second option? If not, you really should. Creamy smooth with a fantastic crust and just a hint of nutmeg it has all one would expect from a holiday classic. And beautiful to bring to the table? You bet!

This is at least a 1950s recipe if not earlier, so has lots of tradition behind it. It's an uncommon pie today and that's a real shame, because it's a really great pie. Plus it's very easy to make.

I have fond memories of this pie. They come from my childhood when the local Women's Institute in a neighbouring village used to host a "Pie Aid" and handmade items fundraiser almost every month. 

The Women's Institute of Canada is an organization that was established over 100 years ago to support women and their families in rural areas. Still active, they provide valuable resources for their members, as well as education on nutrition and help in raising families. Members also volunteer for the benefit of the communities where they are active.


The Pie Aids were hosted in different members homes in rotation. They were as much fundraiser as they were social activity. Mom, dad and I used to get in the car and drive the five miles for every one. 


There were some amazing pie makers, and knitters and tatters—look up tatting if you don't know what it is and be amazed—each proud to make their own specialty.


The secret to good pie pastry is to not, in my father's words, "maul it." Dad used to make all our pies. He was always in a hurry and this worked to his benefit. Just touch the dough enough to bring it together. Not ONE SECOND more. If you follow the directions in the recipe below you will have success.


This recipe, from the old cookbook is so close to what we used to have at those Pie Aids it isn't even funny. When I made this pie I have to say it was extremely easy and the result was amazingly delicious… So here it is, for you to turn into your own holiday tradition.


Old Fashioned Custard Pie


Pastry

This pastry recipe is for a 9" single crust pie from "Fanny Farmer." Tried and true.

1 1/2 cups flour

1/4 tsp salt

1/2 cup shortening or lard

3-4 tbsp ice cold water


Mix the flour and salt. Cut the shortening in to the size of peas. Do not make it any finer. If you do you won't have a flaky crust. Add enough water just to bring it together as a shaggy dough. Check the picture above.


Roll out on a board with just enough flour so it doesn't stick. Lift and place in the pie plate. Do not flute the edge, but rather leave plain trimmed with the edge of the plate, or impressed with the tines of a fork. Refrigerate for at least 30 minutes before filling and baking.


There are two different ways to proceed at this point. The first is to fill it and bake. This results in a soft bottom crust that some prefer and some don't. If desired you can partly pre-bake the shell. Prick the bottom with a fork and bake at 400°F for 15 minutes before filling. I didn't. That's the way I remember the pie from the Pie Aids, but it's your call.


Old-fashioned custard pie filling

2-1/2 cups milk, scalded (I used 10% cream and it's even better than with milk)

4 eggs

1/2 cup sugar

1/4 tsp salt

1/2 tsp vanilla

freshly grated nutmeg


Preheat oven to 400°F. Adjust rack to 5-6 inches from the bottom of the oven.


Scald the milk in the top of a double boiler.(Milk is scalded when bubbles form at the very edge of the pan. Don't let it boil.) After scalding, cover to avoid a skin from forming.


Beat the eggs until the yolks and whites are thoroughly mixed. Add the sugar, salt and scalded milk slowly, stirring constantly.


Quickly strain the custard mixture, add the vanilla and pour, except for 1/3 cup, into the prepared crust.


Beat the remaining custard until very foamy and then gently flow it over the top of the custard already in the pie shell. Sprinkle with grated nutmeg.


Bake for 25 to 30 minutes or until the custard is set except for about 1" in the very centre of the pie. Test for doneness by gently jiggling the pie plate. It should look set but shake in the centre. It will continue to cook after being removed from the oven.


Let cool for 2-3 hours before serving. This pie is best served the day of baking.


#holidaytradition #oldrecipe #thanksgivingrecipe #classicpierecipe #easypierecipe


.......................................

©2021 Docaitta Lifestyle. Feel free to disseminate on any and all of your social media orifices. The more the merrier. :-)

Sunday, November 21, 2021

Italian Sausage with Spinach and Rotini

Before anything else, preparation is the key to success.

Alexander Graham Bell


OK, folks. Post one of my restart. I hope you like.


Storm’s coming! Time to cook something to have ahead, just to be prepared.


It’s November 21st here in Nova Scotia, and depending on who you hear/see we’re either facing a slightly stronger than normal late fall storm or Armageddon with over 100mm of rain. A day or two ago I even saw reports that we may lose power for “several days”. That would suck, especially with regards to my design business where if I don’t work I don’t get paid.

Even though I hope for the former, I have learned long ago to anticipate the latter. That way at least you’re prepared. And potato chips never really last long enough to go bad, even if not used at the intended time. So the ticket is to do an easy “make-ahead” recipe. 


As an aside, but related to my introductory quote, a work companion and I designed the logo for the Alexander Graham Bell Foundation, and their extensive Brand Guide. If inclined, you can see the identity logo here


This recipe is sort of made up by pantry surfing. It’s loosely based on a classic Italian sausage and cannellini bean recipe. But I live 30 minutes away from the nearest larger grocery store and I don't keeps cans of cannellini beans (AKA white beans) as a staple. I know some of you do, but not me.


Most people do have pretty much everything else in this recipe readily on hand, and it's the kind of meal that comes together quite quickly, which is a plus. Around 30 minutes, give or take a few.


This is a perfect dish to make ahead and reheat. So if your power is out and you’re running a generator you can plug in your air fryer/convection oven or microwave for a short time to reheat.


Armageddon or not, it’s one of those great meals for cooler, overcast days. Make sure to cut everything in larger than normal chunks. It makes the end result more "rustic". This is something that sticks to your ribs and makes you feel comforted and warm inside.


RECIPE

Italian Sausage with Spinach and Rotini

Total time (without optional baking) about 35 minutes.


1 tbsp olive oil

1 medium yellow onion, halved and then sliced

1 large carrot, in large dice

4 large garlic cloves, chopped

400g hot Italian sausage meat, torn into chunks

2 plum tomatoes, chopped

1 jar of strained tomato sauce (passata), plus enough water to make 1L

2 tsp oregano

1 tsp sea salt

1 tsp cracked black pepper

250g uncooked rotini

2 cups chicken stock water, or more as necessary

1 cup pre-cooked spinach (can use thawed frozen)

grated parmesan


Cook’s note: if you like crispy bits on your pasta, once completed turn it all into a baking dish, sprinkle with parmesan and bake until browned on top. Just ensure there's enough sauce remaining to make sure it doesn’t dry out during baking. The pasta does tend to absorb it.


DIRECTIONS

Heat the oil in a deep skillet. Add the onion and carrot and sauté until the onions soften. It’s perfectly fine if both the onions and carrots brown a little. Then add the garlic and sauté for 30 seconds.


Add the sausage meat and cook until no longer pink. Then add the chopped tomatoes, tomato sauce with water, oregano, salt and pepper. Cover, reduce the heat to medium low and let cook for 15 minutes. This step helps the carrots cook through since they’re in larger dice.


After 15 minutes is up, stir in the rotini and chicken stock. Bring back to a boil, cover again, and reduce the heat to medium and cook for an additional 12 minutes. Stir occasionally to ensure it doesn’t dry out. 


Pasta cooked this way invariably takes longer than if it is boiled separately. If the pasta needs more water/stock and longer cooking time do so.


Once the pasta is done, remove the pot from the heat and stir in the chopped spinach. Taste for seasonings and adjust.


To serve, place in a bowl and top with grated parmesan. 


If doing the additional bake for crispy top, preheat oven to 400°F, place mixture in a baking dish and top with plenty of parmesan. Bake for about 25 minutes, or until browned on top. (Air fryer 375°F for about 12-15 minutes.)


#ilatianrecipe #homecooking #countrykitchen #italiansausage #makeaheadrecipe


.......................................

©2021 Docaitta Lifestyle. Feel free to disseminate on any and all of your social media orifices. The more the merrier. :-)

Wednesday, November 17, 2021

Now, what was I was saying...

Never find fault with the absent. – Alexander Pope

Ok, I know – it's been a while. More than a while actually. Six and a half years.

Wow.

It didn't feel real until I typed it out.
6.5 YEARS

................................


As you can imagine, quite a lot has happened since the first half of 2015. 

Life has had some stellar high points, as well as some dreadful lows. I've lost a mother—mine this time—during the start of the pandemic (but not COVID-related), a cousin and even a good friend.

I've stopped drinking. That's a good thing. I'm only half-wit(ty) after a few. I'm not against it and there will be rehashing of liqueur recipes, fear not. It's just no longer something I want to do, for me.

I've lost weight, and gained it back, and then lost it again. All on purpose, if you can say you gain weight because you purposefully/mindlessly shove food in your face. I guess you do in a way.

I've discovered a recent penchant for some interesting foraging. Semi-dangerous foraging. More elucidation on that in future posts.

I've done some smart things; I've done some really stupid. As have we all.

We've another Bouvier des Flandres. He's the light of our lives. Big hairy smelly thing that he is. He's now two and still doesn't listen worth a s*#t. I shouldn't say that. He's a very good boy. Most of the time.

Self-employment has been a rollercoaster. Working for yourself holds great joys but I can never get used to the feeling I don't know where my next client will be coming from. You see, when you own the business it's your responsibility to bring in the work so I'm told. That's hard.

I may even cross-pollinate with some material from my design business.

Anyway, I hope you will all take me back into your hearts as I slowly stoke the furnace of my creativity and begin to publish once again. Over my first incarnation as a blogger I received some really wonderful comments on my posts. Heartfelt messages that at the time made it all worthwhile. I'm sure I will again.

Constantly churning out content isn't as easy as it may seem. Sometimes those around you suffer for your "craft". Like my spouse (sorry). So I've made a promise to myself that although I will post very frequently, it just won't be CONSTANTLY. But if you follow in any of the myriad social media channels I use you'll know when I've dropped one – metaphorically.

I'm rebranding this blog as Docaitta LIfestyle. Because essentially that's what I want it to be: a window in on one particular life (mine) and how it's being lived with one foot in the country and one in the city – all while trying to make it on my own. What I find interesting, how I'm occupying my time, what I'm growing or eating, helpful ideas, what grinds my gears, etc. You know – how I used to write.

So as Bette Davis famously said in All About Eve:
"Fasten your seat belts, it's gonna be a bumpy ride."


©2021 Feel free to disseminate my bullshyte on any and all of your social media orifices. The more the merrier. :-)