Sunday, November 21, 2021

Italian Sausage with Spinach and Rotini

Before anything else, preparation is the key to success.

Alexander Graham Bell


OK, folks. Post one of my restart. I hope you like.


Storm’s coming! Time to cook something to have ahead, just to be prepared.


It’s November 21st here in Nova Scotia, and depending on who you hear/see we’re either facing a slightly stronger than normal late fall storm or Armageddon with over 100mm of rain. A day or two ago I even saw reports that we may lose power for “several days”. That would suck, especially with regards to my design business where if I don’t work I don’t get paid.

Even though I hope for the former, I have learned long ago to anticipate the latter. That way at least you’re prepared. And potato chips never really last long enough to go bad, even if not used at the intended time. So the ticket is to do an easy “make-ahead” recipe. 


As an aside, but related to my introductory quote, a work companion and I designed the logo for the Alexander Graham Bell Foundation, and their extensive Brand Guide. If inclined, you can see the identity logo here


This recipe is sort of made up by pantry surfing. It’s loosely based on a classic Italian sausage and cannellini bean recipe. But I live 30 minutes away from the nearest larger grocery store and I don't keeps cans of cannellini beans (AKA white beans) as a staple. I know some of you do, but not me.


Most people do have pretty much everything else in this recipe readily on hand, and it's the kind of meal that comes together quite quickly, which is a plus. Around 30 minutes, give or take a few.


This is a perfect dish to make ahead and reheat. So if your power is out and you’re running a generator you can plug in your air fryer/convection oven or microwave for a short time to reheat.


Armageddon or not, it’s one of those great meals for cooler, overcast days. Make sure to cut everything in larger than normal chunks. It makes the end result more "rustic". This is something that sticks to your ribs and makes you feel comforted and warm inside.


RECIPE

Italian Sausage with Spinach and Rotini

Total time (without optional baking) about 35 minutes.


1 tbsp olive oil

1 medium yellow onion, halved and then sliced

1 large carrot, in large dice

4 large garlic cloves, chopped

400g hot Italian sausage meat, torn into chunks

2 plum tomatoes, chopped

1 jar of strained tomato sauce (passata), plus enough water to make 1L

2 tsp oregano

1 tsp sea salt

1 tsp cracked black pepper

250g uncooked rotini

2 cups chicken stock water, or more as necessary

1 cup pre-cooked spinach (can use thawed frozen)

grated parmesan


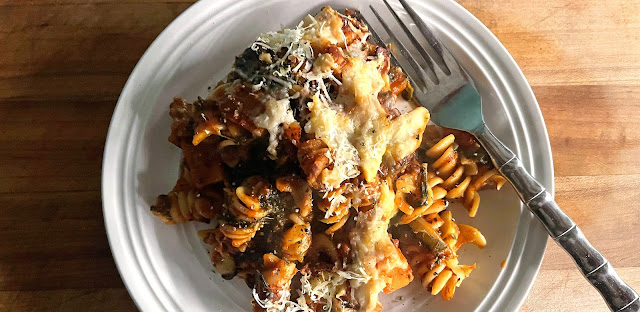
Cook’s note: if you like crispy bits on your pasta, once completed turn it all into a baking dish, sprinkle with parmesan and bake until browned on top. Just ensure there's enough sauce remaining to make sure it doesn’t dry out during baking. The pasta does tend to absorb it.

DIRECTIONS

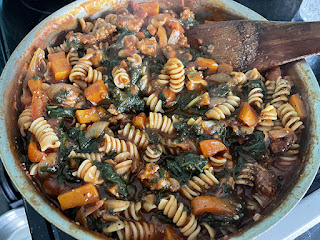
Heat the oil in a deep skillet. Add the onion and carrot and sauté until the onions soften. It’s perfectly fine if both the onions and carrots brown a little. Then add the garlic and sauté for 30 seconds.


Add the sausage meat and cook until no longer pink. Then add the chopped tomatoes, tomato sauce with water, oregano, salt and pepper. Cover, reduce the heat to medium low and let cook for 15 minutes. This step helps the carrots cook through since they’re in larger dice.


After 15 minutes is up, stir in the rotini and chicken stock. Bring back to a boil, cover again, and reduce the heat to medium and cook for an additional 12 minutes. Stir occasionally to ensure it doesn’t dry out. 


Pasta cooked this way invariably takes longer than if it is boiled separately. If the pasta needs more water/stock and longer cooking time do so.


Once the pasta is done, remove the pot from the heat and stir in the chopped spinach. Taste for seasonings and adjust.


To serve, place in a bowl and top with grated parmesan. 


If doing the additional bake for crispy top, preheat oven to 400°F, place mixture in a baking dish and top with plenty of parmesan. Bake for about 25 minutes, or until browned on top. (Air fryer 375°F for about 12-15 minutes.)


#ilatianrecipe #homecooking #countrykitchen #italiansausage #makeaheadrecipe


.......................................

©2021 Docaitta Lifestyle. Feel free to disseminate on any and all of your social media orifices. The more the merrier. :-)

Wednesday, November 17, 2021

Now, what was I was saying...

Never find fault with the absent. – Alexander Pope

Ok, I know – it's been a while. More than a while actually. Six and a half years.

Wow.

It didn't feel real until I typed it out.
6.5 YEARS

................................


As you can imagine, quite a lot has happened since the first half of 2015. 

Life has had some stellar high points, as well as some dreadful lows. I've lost a mother—mine this time—during the start of the pandemic (but not COVID-related), a cousin and even a good friend.

I've stopped drinking. That's a good thing. I'm only half-wit(ty) after a few. I'm not against it and there will be rehashing of liqueur recipes, fear not. It's just no longer something I want to do, for me.

I've lost weight, and gained it back, and then lost it again. All on purpose, if you can say you gain weight because you purposefully/mindlessly shove food in your face. I guess you do in a way.

I've discovered a recent penchant for some interesting foraging. Semi-dangerous foraging. More elucidation on that in future posts.

I've done some smart things; I've done some really stupid. As have we all.

We've another Bouvier des Flandres. He's the light of our lives. Big hairy smelly thing that he is. He's now two and still doesn't listen worth a s*#t. I shouldn't say that. He's a very good boy. Most of the time.

Self-employment has been a rollercoaster. Working for yourself holds great joys but I can never get used to the feeling I don't know where my next client will be coming from. You see, when you own the business it's your responsibility to bring in the work so I'm told. That's hard.

I may even cross-pollinate with some material from my design business.

Anyway, I hope you will all take me back into your hearts as I slowly stoke the furnace of my creativity and begin to publish once again. Over my first incarnation as a blogger I received some really wonderful comments on my posts. Heartfelt messages that at the time made it all worthwhile. I'm sure I will again.

Constantly churning out content isn't as easy as it may seem. Sometimes those around you suffer for your "craft". Like my spouse (sorry). So I've made a promise to myself that although I will post very frequently, it just won't be CONSTANTLY. But if you follow in any of the myriad social media channels I use you'll know when I've dropped one – metaphorically.

I'm rebranding this blog as Docaitta LIfestyle. Because essentially that's what I want it to be: a window in on one particular life (mine) and how it's being lived with one foot in the country and one in the city – all while trying to make it on my own. What I find interesting, how I'm occupying my time, what I'm growing or eating, helpful ideas, what grinds my gears, etc. You know – how I used to write.

So as Bette Davis famously said in All About Eve:
"Fasten your seat belts, it's gonna be a bumpy ride."


©2021 Feel free to disseminate my bullshyte on any and all of your social media orifices. The more the merrier. :-)

Sunday, May 3, 2015

Homey Brown Sugar Bread

Where we love is home - home that our feet may leave, but not our hearts. – Oliver Wendell Holmes, Sr.


Life is strange, even at its best. Life is also not a spectator sport. You have to muck in.

You will have noticed, dear readers, that it has been an ungodly long time since my last post. March 19, to be exact. No I haven’t died, but my mother-in-law has. We received some extremely bad news at the end of January. The “C” word. It took only two months for her to leave us.

Instantly upon hearing the news, my husband withdrew from college and moved back home to be with, support and care for her. He did an amazing job, and I could not be more proud of him.

I also helped out the best I could at every opportunity. A functioning “office” was set up in her home so I could work as comfortably from there as I did from my other two offices. You do what you must when circumstances are thrust upon you, and there was no way in hell I would not be there for both her and my husband.

Her other son, who lives with his family out west, also did the best he could – coming home twice in close succession. It was hard for us, and must have been equally hard for him being so far away.

But, at the end of her days, she knew she was loved, is loved, and will be missed terribly. In her own quiet way she was an incredible woman, and I feel honoured to have gotten to know her better, even under the circumstances.

Now we have moved beyond the traumatic shock that caring for a dying parent brings, on to the practical matters of closing up house, and setting affairs in order. Life is still, if you will pardon the colloquialism, a shit show.

Out of all of this I have learned a very valuable lesson. Home actually IS where the heart is. It’s not bricks or mortar or a plot of land. Home is wherever you are, where you are surrounded by those you love and who love you. Anyone who thinks otherwise is a short-sighted fool.

What does this have to do with bread? Probably not much, but it seems I always give you a recipe, so why not, eh? I could go on at length about home and homeyness and memories and  such. But you know all that.

So here it is. This is not a sweet bread, but a toast and sandwich bread. With four buns there's plenty of "fluffy bits" for people to fight over. You could just as easily do three, two or even just one. 

Think of this bread as a pale, winter-weary version of Maritime Brown Bread. Anyone experiencing this year's spring in Nova Scotia knows exactly what I mean. (link here)


Brown Sugar Bread
Prep: 20 min  |  Rise: 3 hrs  |  Bake: 30-35 min  |  Yield: 1 big-ass loaf


2 cups water, 110°F
1/3 cup brown sugar
1 tbsp yeast
1 egg
1/4 cup butter, melted
1-1/2 tsp salt
5 cups flour

Place the warm water and brown sugar in a large bowl. Add the yeast and allow to proof until bubbly and creamy, about 15 minutes.

Add the egg, butter, salt and flour. Knead for 5 minutes on the counter. The dough should be slightly wet feeling to the touch, but fairly firm and soft.

Wash and butter the bowl you brought the dough together in. Place the dough in the bowl, cover with plastic wrap and a tea towel and let rise for 2 hours, or until doubled.

Punch the dough down, knead briefly and divide into four equal balls. Line the balls up in a buttered high-sided 5”x9” baking dish. Let rise until doubled again, about 1 hour.

Just before the dough is finished rising, preheat the oven to 425°F. Place a shallow dish with a cup or so of water in it on the bottom rack. This hydrates the oven and gives the bread an initial “push” as its baking.

Bake on the middle rack for 30-35 minutes, until browned on top and the loaf sounds hollow when tapped with your fingers. Let cool, if you can wait.

Have butter and your favourite jam very close by...


................................................................................................................................................

If you like this post, feel free to share it. All I ask for is credit and a link back to this page.

Thursday, March 19, 2015

Blood Orange & Ricotta Pound Cake

All things are only transitory. – Johann Wolfgang von Goethe


If you think it’s been a long time since my last post, you’re right. Things are very interesting around here right now. It’s like the Chinese curse “May you live in interesting times.” I feel pulled in about 4 different directions at once. 

I know Goethe is right, it’s just being in the middle of it that sucks. I won’t bore you with the details. Instead I’ll bore you with a recipe...

Blood oranges, also called Moro oranges, are a type of orange that has tart, sweet flesh that is unexpectedly red – hence the name. Although grown commercially in California, many blood oranges come from Southern Italy, particularly Sicily. They are usually available from January through April. So you have to take advantage of them while they’re around.

This is what "creamed" butter and sugar
looks like. Light and fluffy.
You can tell a blood orange (besides the name on the bag or the sign above them...) by the reddish blush that appears on the skin when fully ripe. They can be smaller or larger than a regular Valencia (common) orange, and contain very few seeds.

I find that the flavour of a well-ripened blood orange is still tart, but almost raspberry-like. They are quite delicious.

Here’s some orange facts, thanks to the folks at Sunkist®:
All oranges contain carotene — that's what makes them orange. Moros get their red color from high concentrations of a pigment called anthocyanin, a powerful antioxidant that neutralizes the effects of free radicals. Free radicals are the agents believed to be responsible for cancer, aging and other health ailments.

Since I’m on my third bag of blood oranges, I thought it might be okay to sacrifice one for a cake. Orange pound cake is always a favourite, especially for a dinner with one’s mother – which I had the evening I made this. She was pleasantly surprised. :-)

Abraham Lincoln said: “All that I am, or hope to be, I owe to my angel mother.” Show yours some love. Do something nice for her today. Just like blood oranges, you are only blessed with her presence for far too short a time. 


Blood Orange & Ricotta Pound Cake
Prep 15 min  |  Bake 60 min  |  Yield 9” loaf
The dough is pretty stiff. Don't worry.
1-1/2 cups white flour + 1 tbsp
2-1/2 tsp baking powder
1 tsp sea salt
3/4 cup butter, softened
3/4 cup low-fat ricotta
juice and rind of 1 blood orange
1-1/2 cups white sugar
3 lg eggs
1 tsp pure vanilla extract
icing sugar, for dusting after baking

Preheat the oven to 350°F. Grease and flour a 9-inch loaf pan.

Combine the flour, baking powder, and salt in a bowl and set aside. Wash, and then zest and juice the orange. Set aside.

Cream together the butter, ricotta, and sugar on medium speed until light, fluffy, smooth and no longer grainy. Scrape down the sides of the bowl as needed.

Add the eggs one at a time – beating just long enough that they are incorporated. Then beat in the rind, orange juice and vanilla.

Beat in the dry ingredients until mixed.

Scoop the batter out into the pan, taking care to not trap any air pockets in the corners and level the top with a spatula. 

Bake for about 50 minutes and then test the cake by inserting a toothpick in the centre. If the toothpick does not come out clean, put it back in the oven for 10 more minutes and test again. It may take longer than an hour to bake, depending on the amount of juice, moisture content of flour, wetness of the ricotta, etc. Toothpick testing is reliable. Mine took longer, by a fair bit.

Expect the top to mound up and crack open – it’s the sign of a classic pound cake.

The classi pound cake crack. 
Remove from the oven, let cool for 10-15 minutes; then remove from the pan to finish cooling on a wire rack. Dust with icing sugar after it cools.

................................................................................................................................................
If you like this post, feel free to share it. All I ask for is credit and a link back to this page.

Wednesday, February 11, 2015

Crispy Baked Beet Chips (that aren’t burnt)

You don't fix the problem until you define it. – John W. Snow


This recipe is posted in loving appreciation of our mothers, who tried their best to get us to eat things we didn't want to. Most times with a pinch of thanks and a pound of opposition. We love you.

My previous burnt beet chips.
And these were the "good" ones.
I’ve made beet chips before, about as successfully as most of the other home cooks that have posted comments online. In other words, very unsuccessfully. To contribute to the overall betterment of our species, I felt it fell upon my shoulders to fix the problem.

Most online recipes aver such confidence-inducing statements as “crispy, baked beets in XX minutes!” or “this recipe is so easy...”. Well, yes, it is easy, or at least slicing beets with a mandolin is easy. 

But 30 minutes at the most commonly listed temperature of 375°F? That is where things go downhill. Quickly. Have you ever tasted a burnt beet slice? I recommend that you don’t. They’re ugly.

Four medium beets is probably enough for 2 people.
375°F is just too high, especially when non-adjustable mandolins slice food paper thin. You know what I mean by paper thin: like potato chip thin. When one is touting a recipe as beet “chips” they should be “chips” as opposed to beet slabs. Slabs are the only way I can figure the beets in those recipes didn't burn.

The first time I made these—they’re very low calorie—I ate about half of the slices I put into the oven. The other half were burnt beyond consumption. I believe even my compost bin ejected them. I followed the recipe to a “T,” and carefully watched them. It took seconds to go from not-quite-dry-enough to charcoal.

So something had to be done, because the ones that weren’t burnt were pretty good. I hate to put in 100% effort on a 50% return.

But there's more to this post than just the satisfaction of making a recipe work. One medium beet (2” / 5 cm wide) has 35 calories. That’s the same as a slice of “calorie-wise” Kraft swiss cheese food. (“Food” – it’s that way on the packaging.) Plus beets have a significant amount of antioxidant and anti-inflammatory betalains. And don’t forget potassium, dietary fibre, protein, vitamins, and minerals.

The red also colours whatever's in your stomach, so the
next morning don't be startled if things look unusual...
So as you can see, it’s a shame to waste them by burning the heck out of them. And before you say you don't like beets – no, they don’t taste like dirt. The sugars get concentrated. They taste like heaven.

I took a cue from the sweet potato chews I used to make for our Bouvier, Henry. They’re posted on this site if you want to look them up. They ended up not being so much chewy as crisp. They took a couple hours, being much thicker, but the magic was in the oven temperature. They were baked at a low temperature. No burning.

So that’s what I did, and if you follow the recipe below you will have success. I made two trays, one sprinkled with ground ginger and one with ground rosemary, plus salt.

If you like #stormchips but not so much the fat they’re fried in, give these a try. You’ll be surprised how delicious and guilt-free they are.


Crispy Baked Beet Chips
Time, including baking: 45 min
4 medium beets, washed well, stems removed
4 tsp olive oil
salt to taste
optional: ground ginger, sage, ground cumin, 5-spice powder, or orange zest

After 35 minutes at 265°F. They crisped up in about a minute after being
removed from the oven. And not one was burned.

Preheat the oven to 265°F.

Slice the beets, using a mandolin slicer. Divide the olive oil between two cookie sheets or jelly roll pans. Cover the entire surface.

Lay the beet slices in the pans without touching. Sprinkle with salt and then your favourite optional spice or herb topping.

Bake in the centre of the preheated oven for 35 minutes. After 35 minutes, check the slices. They should be curled but still deep red. If you wish, bake for 5 minutes more, but watch them like a hawk.

Remove from the oven and let cool. They will crisp up as they cool.

————————————————————————————————————————

If you like this post, feel free to share it. All I ask for is credit and a link back to this page.

Monday, February 2, 2015

Tandoori Chicken, for the calorie-conscious

Hell isn't merely paved with good intentions; it's walled and roofed with them. Yes, and furnished too. – Aldous Huxley


I had made myself (and you) a promise in the new year. I was going to post more often. I guess I am on my way to hell, unless I soon rectify it. 

I suppose, if I do have an excuse it would be that I have been on an extremely low-calorie diet. I’ve been experimenting a bit more than usual with trying to get maximum flavour into minimum food, sometimes with spectacular failure. 
The mixed marinade.

So there’s been recipes that were either uninspired or not fit to ever make again – let alone post. Hooray for memorably bad meals!! Not.

But every once in a while you dig up a gem. And if you're lucky you only have to swap out one ingredient. Like full fat for low fat yogurt. 

Chicken is the dieters friend once the skin and fat are removed, unlike beef and even pork. I’m learning, slowly, how to "low-cal interpret" the things I eat. I’m not starving, but I do watch my in-take, and evening snacks are definitely (definitely) O-U-T.


Seal and let the chicken marinate for
one day. There's enough marinade for
four breasts, if you would like.
Here's a little diet factoid for you. Two teaspoons of butter (70 cal) have fewer calories than grape seed oil (80 cal) and about the same number as olive oil (65 cal). 

So don't feel you have to ditch butter on a low calorie diet. Just everything in moderation. Oscar Wilde added "including moderation." I tend to concur.

For your edification, I have broken out the calories per ingredient in this dish. Knock on wood, but I have had success since starting my calorie death watch about a month ago. I have dropped slightly over 8 pounds. No time to quit now. 10-15 more to go!

The size of your chicken breast will determine the end calorie count. Eat a monster and you get monster calories... makes sense, right?

The accompaniment for this dish is a Raita, made with yogurt-marinated onion, tomato, cucumber, and cumin. Very fresh and delcious against the spiciness of the chicken. Keep in mind, you're not consuming all of the marinade, probably 1/4 of it per chicken breast.

And, just so you know, I have about 4 more recipes lined up. So heaven’s getting closer all the time.


Tandoori Chicken
Prep: overnight  |  Bake: 20 min  |  Serves 2
2 medium chicken breasts, skinless and boneless 6oz = 300 cal
1/2 cup low-fat greek style yogurt 125 cal
2 tbsp lemon juice 8 cal
1 tsp ground garlic 5 cal
1 tsp ground ginger 2 cal
1 tsp ground cumin 8 cal
1/2 tsp ground cardamom 3 cal
1/2 to 1 tsp cayenne pepper 3-6 cal
1/2 tsp cracked black pepper 8 cal
1/4 tsp salt
1/4 tsp ground cinnamon 1.5 cal
6-8 drops each, red and yellow food colouring (optional, but a good addition)

Mix all the ingredients of the marinade in an electric blender or a food processor and process until thoroughly puréed. Pour the marinade over chicken, toss and rub, to coat thoroughly. Cover and refrigerate for 24 hours.

Preheat oven to 400°F. Place chicken in a single layer on foil. Bake in the middle of the oven for 20 minutes, turning once and basting with marinade juices  until cooked.

For a low calorie accompaniment for 2, serve Raita: mix 1/2 a sliced field cucumber, 1 sliced medium onion, and 1 diced plum tomato with 1/2 cup yogurt and 1 tsp cumin seed. Let sit for 1 hour, or overnight in the refrigerator, before serving.

.............................................................

If you like this post, feel free to share it. All I ask for is credit and a link back to this page.